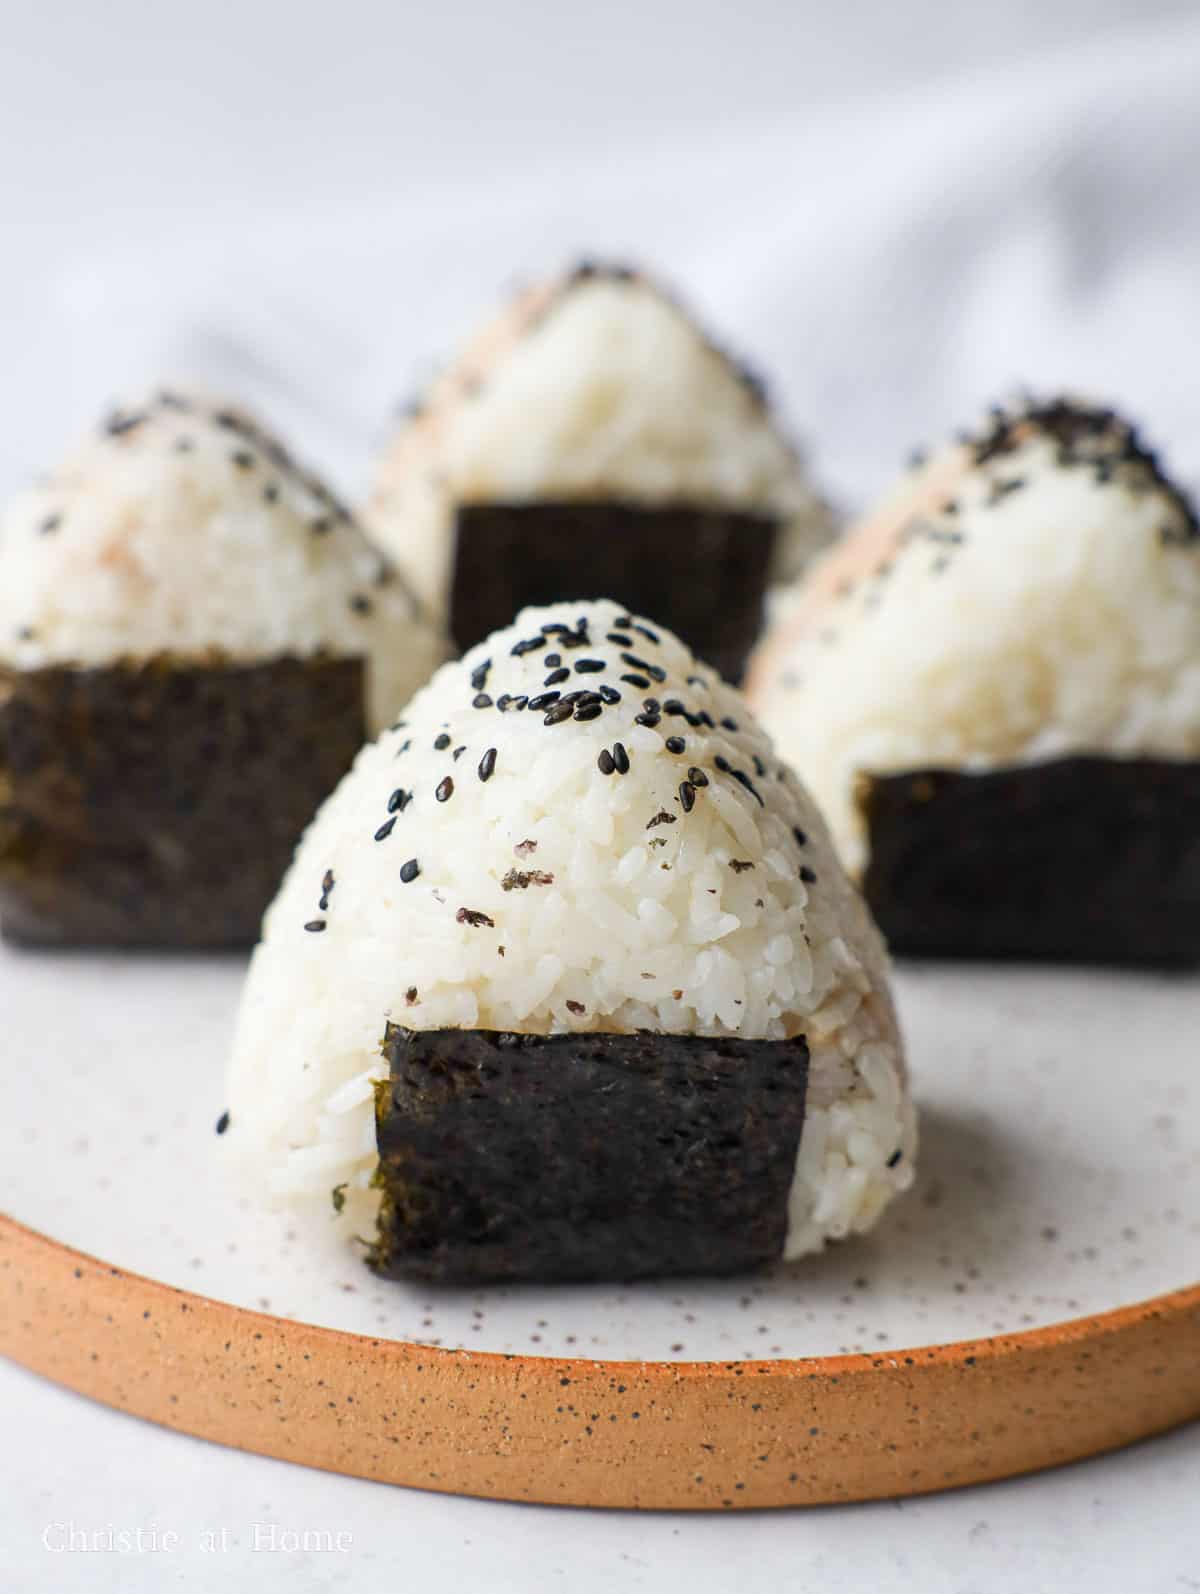
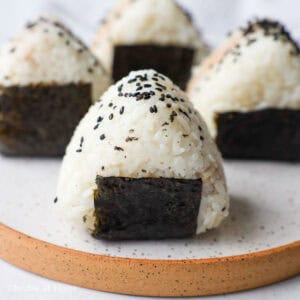
A delicious rice ball stuffed with tuna, mayo wrapped with dry roasted seaweed. This quick and easy Japanese tuna onigiri is made in 15 minutes with only 6 ingredients. Great for breakfast, as a snack, meal, lunchbox item or picnic food!
Jump to:
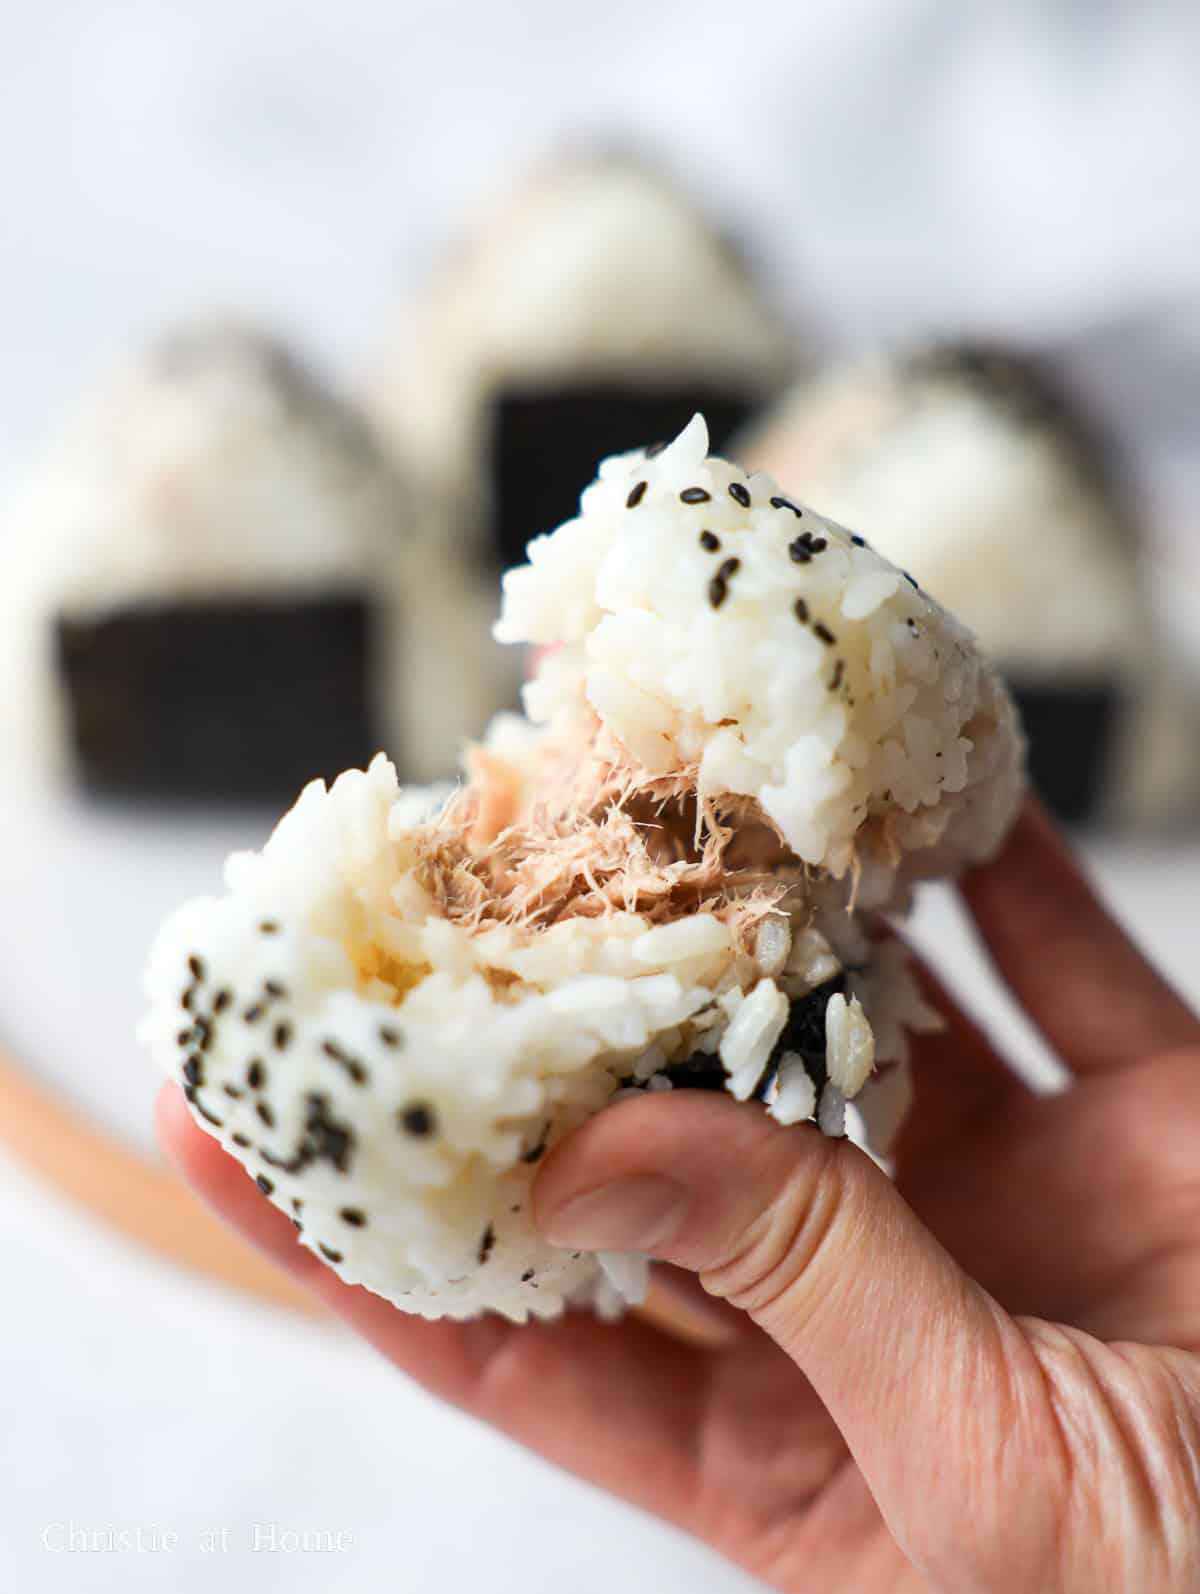
Tuna onigiri features cooked short-grain rice seasoned with salt stuffed with a creamy tuna mayo filling and wrapped with nori. It's delicious and one of my favorite Japanese foods to eat!
It's a popular food item sold at Japanese convenience stores (or "konbini") with different fillings, like spicy tuna mayo, spam, crab mayo, pickled plum, salmon mayo, sweet fish roe, or shrimp tempura and more!
Many hungry commuters or students enjoy will grab one to go because it's filling, delicious, cheap and portable. It's also a great way to add seafood to your diet.
The best part about this convenient Japanese food is you can make it at home with minimal ingredients in a quick manner, if you have leftover rice to reheat.
I share how to make this without a mold using just your hands. But if you have an onigiri mold or even a large sheet of plastic wrap, that will be helpful in molding the rice balls even though it's not necessary.
I make this almost every week whenever I have no idea what to eat since I usually have canned tuna lying around and it does the job at filling my tummy!
Ingredients & Substitutes
Please scroll down to below recipe card for exact measurements.
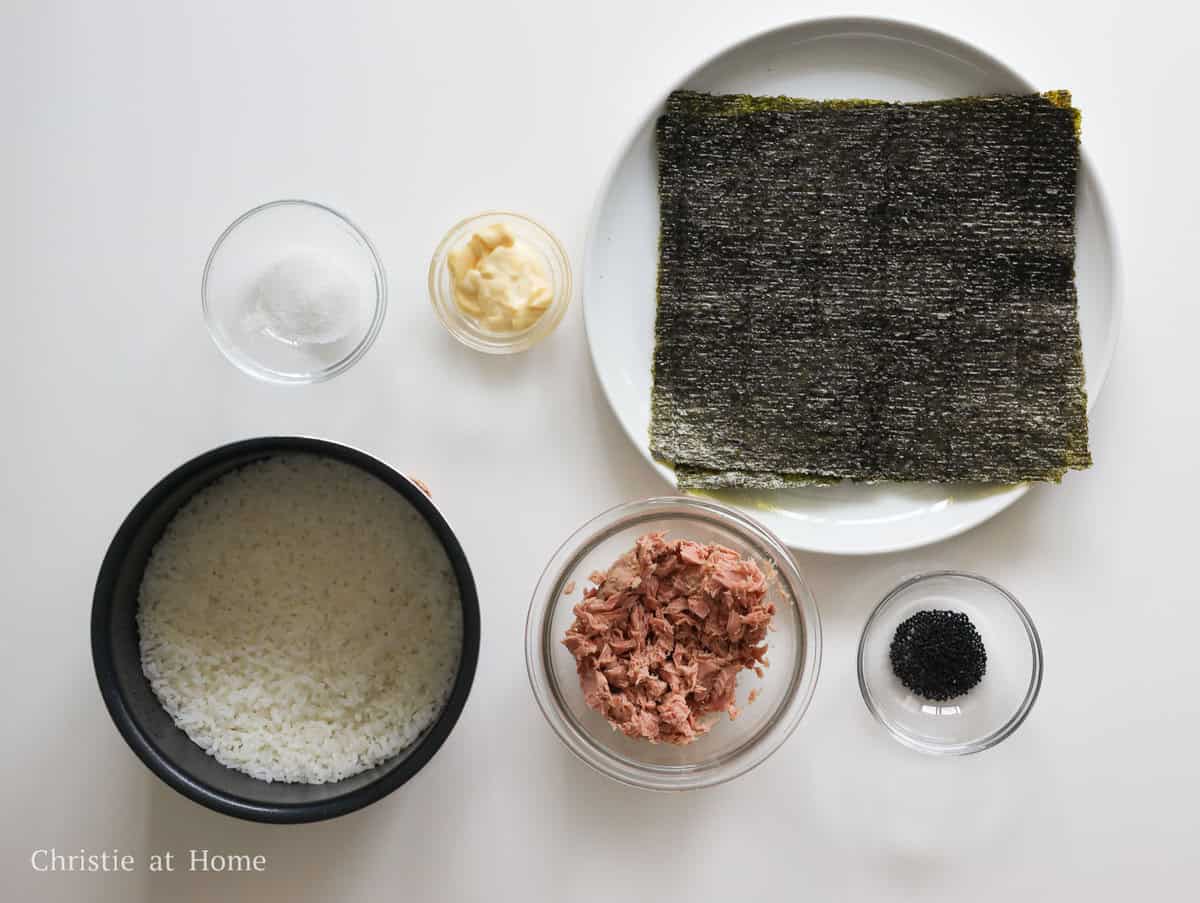
- Cooked Short-Grain Rice (aka "Calrose Rice" or "Sushi Rice"): this type of rice is recommended for its sticky texture so the rice ball can hold shape. Or substitute with freshly cooked medium grain rice and add a few more tablespoons of water to steam the rice so it's stickier. Avoid any long grain white rice or glutinous rice, arborio rice.
- Salt: to season the rice.
- Canned Tuna in Oil: I recommend canned tuna in oil for a smoother texture and taste. Or substitute with canned tuna in water but this will taste a bit drier.
- Japanese Mayo (aka Kewpie mayo): a creamy Japanese-style mayonnaise made of egg yolks instead of using whole eggs like in regular mayo. As a last resort, substitute with regular mayo that is thick and creamy.
- Nori: this is a sheet of dry roasted seaweed that is sold at many Asian grocery stores, select Western grocers, or online, like on Amazon. Or substitute with Korean gim.
- Sesame Seeds: for garnishing. This is optional so omit if you're allergic or don't have the ingredient. Or substitute with furikake.
Note: Most Asian grocers will carry these ingredients. You may find some at your select grocery store or online, like on Amazon.
Expert Tips
- Use canned tuna in oil over tuna in water for best flavor.
- Strain canned tuna to remove as much liquids as possible with a fine sieve by pressing it with a fork to push out the liquids.
- Use freshly cooked rice for best taste and texture as it has more moisture and will hold shape better.
- If you're preparing fresh rice, add 3 tablespoons or 45 ml more water to the rice cooker to make the rice stickier.
- Cover the cooked rice to keep it moist so the rice doesn't dry out or the rice ball won't hold shape.
- Don't remove the nori from the packaging until assembly. The moisture in the air will make it soggy.
- Use clean wet hands when shaping the rice ball so the rice doesn't stick everywhere. If you have an onigiri mold or a large sheet of plastic wrap, use it because it can be so helpful at preventing a sticky mess.
- Push the tuna filling into the center of the rice ball when shaping the ball, so it doesn't leak out.
- Use the L-shape between the thumb and index finger to shape the rice ball into a triangle.
- Firmly pack the rice ball so it holds shape and doesn't break apart later.
Instructions
Below are step-by-step instructions on how to make Japanese tuna onigiri:
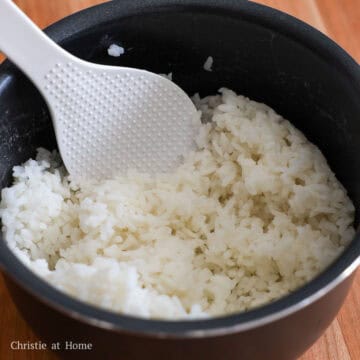
- Transfer hot cooked short-grain rice into a large bowl and season with salt with a rice paddle. Cover and set aside. (If you're using leftover cold rice, cover and microwave it for 2-3 minutes prior to seasoning).
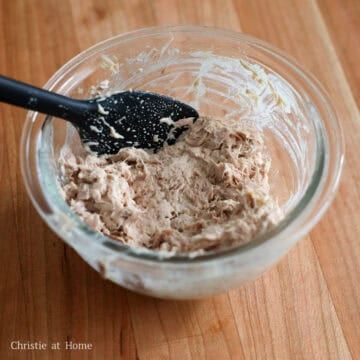
- Open a can of tuna and strain the tuna using a fine sieve removing as much of the liquids as possible by pressing it with a fork. Transfer the strained tuna to a small bowl. Mix in the Japanese mayo until combined. Set aside.
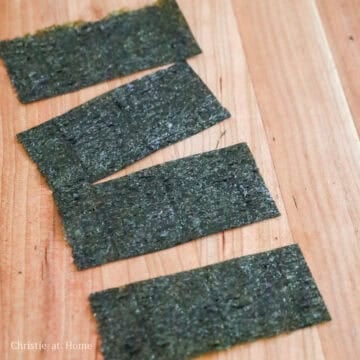
- For the nori sheets, the amount used is personal preference. If you prefer more dry roasted seaweed, use two nori sheets and cut them into half so you have 4 pieces. If you prefer less nori, use half a sheet and cut them into 4 equal strips. Set aside.
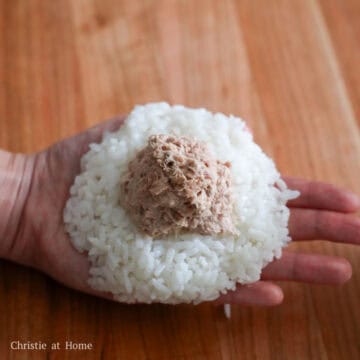
- Prepare a bowl of water nearby and dip clean hands into the water. Take ½ cup or 100 grams cooked rice and place it into the palm of your hand. Shape it into a round ball, then flatten into a ½-inch thick pancake. Make a dent in the middle. Place 2 tablespoon or 30 ml of tuna mayo mixture into the dent.(If you have an onigiri mold or a large sheet of plastic wrap, use these tools to help easily mold the rice balls to prevent a sticky mess)
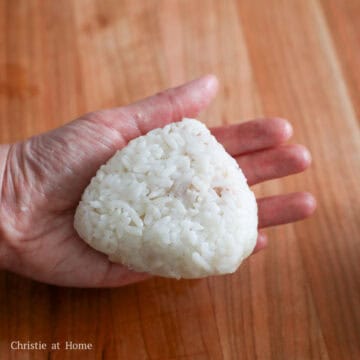
- Fold the rice over the filling and as you fold, push the filling into the center. Firmly pack it into a ball, flatten it so it's 1.5-inch thick and shape it into a triangle, wetting your hands as needed.
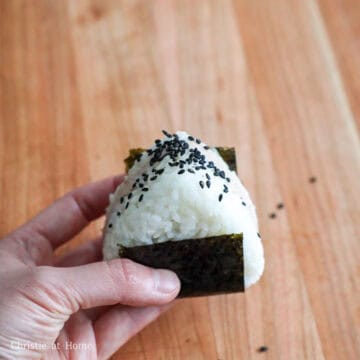
- Wrap a sheet nori from the base of the triangle around the sides and repeat this process until you have 4 rice balls in total. Garnish each piece with sesame seeds. Enjoy immediately!
Storage
- Onigiri is best enjoyed fresh because rice is a breeding ground for bacteria at room temperature.
- Leftovers can be stored in the fridge for up to 2-3 days. To store, wrap each onigiri in plastic wrap and store into an airtight container. To enjoy, reheat the onigiri in the microwave for 60-90 seconds or until the rice is hot throughout. Warning: the fish won't taste as fresh and the seaweed will become soggy, so if you want to make this dish in advance visit the FAQ section below.
- Freezer-friendly? I don't recommend freezing tuna onigiri because the rice will harden even after reheating.
Pairing Suggestions
Tuna onigiri serves well with:
- starters like miso soup, Japanese crab corn salad or salad with Japanese ginger salad dressing or korokke
- seafood dishes like shrimp tempura, panko shrimp or ebi mayo
- protein dishes like ramen eggs, chicken katsu or tonkatsu, karaage, teriyaki tofu, teriyaki chicken, or ginger miso salmon.
- rice dishes like oyakodon, omurice, or katsudon
- other noodle dishes like yaki udon, creamy mushroom udon, or udon carbonara
- or tamago sando
FAQ
Tuna onigiri can be made up to 4 days in advance but for best taste I recommend preparing and storing the different component into separate airtight containers in the fridge. Do not prepare the nori in advance as this will become soggy over time. On the day of serving, cover and microwave the rice for 2-3 minutes or until hot and assemble the onigiri as per the recipe instructions.
To cook rice in a rice cooker: Rinse rice in the rice cooker pot with cold running water until it runs clear. Strain out the water. Fill rice cooker pot with fresh cold water to the instructed water line in the pot. Press "steam" or "white rice" button on your rice cooker.
To cook rice on the stovetop using a pan:
1) Rinse rice under cold running water until it runs clear and then strain. Transfer strained rice to a medium-sized pot or pan, ideally non-stick.
2) Then place your index finger above the rice and fill it with fresh cold water to the the first knuckle line of the finger.
3) Cover with a lid and bring to a boil on medium heat. Then reduce to low heat and keep covered. Cook for 12-14 minutes until most of the water has evaporated. If there's water in the base of the pot, continue to cook on low until there isn't.
4) Take the pot off the heat. Let this rest covered for another 10-12 minutes so the rice can properly cook through a steaming process. The finished rice will be sticky (not wet) and you should be able to fluff it with a rice paddle.
Other recipes you may like
📖 Recipe
15-min. Easy Japanese Tuna Onigiri
Ingredients
- 2 sheets nori or use ½ sheet if you prefer less
- 1 tsp sesame seeds for garnishing, optional
For the Rice
- 2 cups cooked short grain rice *if you're making fresh rice, see Notes below
- ½ teaspoon salt
Tuna Mayo Mixture
- 5.29 oz canned tuna in oil recommended, or canned tuna in water
- 2 tablespoon Japanese mayo or regular mayonnaise
Instructions
- Transfer hot cooked short-grain rice into a large bowl and season with salt with a rice paddle. Cover and set aside. (If you're using leftover cold rice, cover and microwave it for 2-3 minutes prior to seasoning).
- Open a can of tuna and strain the tuna using a fine sieve removing as much of the liquids as possible by pressing it with a fork. Transfer the strained tuna to a small bowl. Mix in the Japanese mayo until combined. Set aside.
- For the nori sheets, the amount used is personal preference. If you prefer more dry roasted seaweed, use two nori sheets and cut them into half so you have 4 pieces. If you prefer less nori, use half a sheet and cut them into 4 equal strips. Set aside.
- Prepare a bowl of water nearby and dip clean hands into the water. Take ½ cup or 100 grams cooked rice and place it into the palm of your hand. Shape it into a round ball, then flatten into a ½-inch thick pancake. Make a dent in the middle. Place 2 tablespoon or 30 ml of tuna mayo mixture into the dent. (*If you have an onigiri mold or a large sheet of plastic wrap, use these tools to help easily mold the rice balls to prevent a sticky mess)
- Fold the rice over the filling and as you fold, push the filling into the center. Firmly pack it into a ball, flatten it so it's 1.5-inch thick and shape it into a triangle, wetting your hands as needed.
- Wrap a sheet nori from the base of the triangle around the sides and repeat this process until you have 4 rice balls in total. Garnish each piece with sesame seeds. Enjoy immediately!
Notes
How much uncooked rice is needed?
Measure out ¾ cup / 160 grams uncooked short grain rice for this recipe.To cook rice in a rice cooker
- Rinse rice in the rice cooker pot with cold running water until it runs clear. Strain out the water.
- Fill rice cooker pot with fresh cold water to the instructed water line in the pot.
- Press "steam" or "white rice" button on your rice cooker.
To cook rice on the stove top using a pan:
- Rinse rice under cold running water until it runs clear and then strain. Transfer strained rice to a medium-sized pot or pan, ideally non-stick.
- Then place your index finger above the rice and fill it with fresh cold water to the the first knuckle line of the finger.
- Cover with a lid and bring to a boil on medium heat. Then reduce to low heat and keep covered. Cook for 12-14 minutes until most of the water has evaporated. If there's water in the base of the pot, continue to cook on low until there isn't.
- Take the pot off the heat. Let this rest covered for another 10-12 minutes so the rice can properly cook through a steaming process. The finished rice will be sticky (not wet) and you should be able to fluff it with a rice paddle.


Amea
Tried it today! This was so good! Thank you
Christie Lai
Thanks for making my recipe, Amea! Glad you enjoyed it 🙂
Franci
This is a super detailed and very helpful recipe. Thank you for creating it. 🙂
Christie Lai
Thanks so much!
Jim
goog
Christie Lai
Thank you so much for making my recipe and for leaving this positive review, Jim!
Brielle
I’m a total newbie at this, and it took me a bit longer that 15 minutes but that’s because I didn’t have a rice cooker and I didn’t know how to wrap Onigiri (practice makes perfect) but instead of sesame seeds I used Chia seeds and instead of seaweed I used rice seasoning, which had seaweed in it. ITS SO GOOD AND FILLING! Thank you😁
Christie Lai
Thank you so much for the positive feedback and for making my recipe! Glad you enjoyed it!
Jackie
My daughters LOVE these! We made them together tonight and they packed up the extra to take to school for lunch tomorrow! They’re so proud of themselves and they taste great.
Christie Lai
Thank you so much for making my recipe! So glad you all enjoyed them! They should be so proud 🙂
Christina
is there a specific brand of canned tuna? or would any canned tuna in the super market work?
christieathome
Any canned tuna will work 🙂
Lexi
With this recipe, and my instant pot for sticky rice, we love making onigiri!! Ever since we found your recipe, me and my oldest have so much fun making it together. Thanks for the memories!
christieathome
Thank you so much for making my recipe, Lexi! This really brings a smile to my face and happy I can help trigger some good memories 🙂
Val
What should I do with leftover mayo tuna?
Really good, even though I had to use thin egg strips in place of nori.
Barbara
I'm confused. Do you mean that I have to make rice for sushi (adding ingredients to the hot short-grain rice) before I can make onigiri?
christieathome
This recipe calls for cooked short grain rice that you would then season with the instructed ingredients and then you would stuff it with the tuna mixture. There's a video in the recipe card to further demonstrate how this is made.
Rebecca Dillon
Oooh. This sounds really good. I've never tried this dish before but it's definitely on my list now.
christieathome
Thanks Rebecca! They're so good as a snack!
Heidi | The Frugal Girls
I loved the adorable triangle shapes you used to create these little tuna wonders... and I think this would be such a fun recipe to make with the kiddos!
christieathome
Thanks so much Heidi! They really would be so fun for the kids!
Michelle | Sift & Simmer
Love love tuna onigiri! It's my kids' favourite, so we make it all the time! Yours look amazing!
christieathome
OMGosh same!! I've been eating it non stop haha! It's just my favourite little snack!
TONYA
My hands are my favorite tools! I love that it's only seven ingredients. WIN!
christieathome
Thank you so much!!
Rosemary
Tuna is one of my favorite fishes, after salmon! And... that sticky rice looks AMAZING Girl!! Gawd I am really craving some Asian food now